Business settings explained
Last updated: 7 November 2026 · 6 min read
Business Settings is where you tell BillBook how your shop works: your currency, your tax numbers, what a product needs, how the till behaves and how reference numbers start. This page is a map. It tells you what each tab is for and which settings to look at first.
Before you start: You need permission to open Settings. To jump straight to one setting by name, read Find any setting fast.
The page has a search box at the top. Type a word such as currency, SKU or tax, or press /, to jump to a setting. The tab list on the left starts with Business, Tax, Product, Contact, Sale, POS, Purchases, Payment, Dashboard and Modules. Select Show advanced settings under the list to add Display Screen, Prefixes, Email Settings, SMS Settings, WhatsApp, Reward Point Settings and Custom Labels.
Business tab#
- Go to Settings > Business Settings.
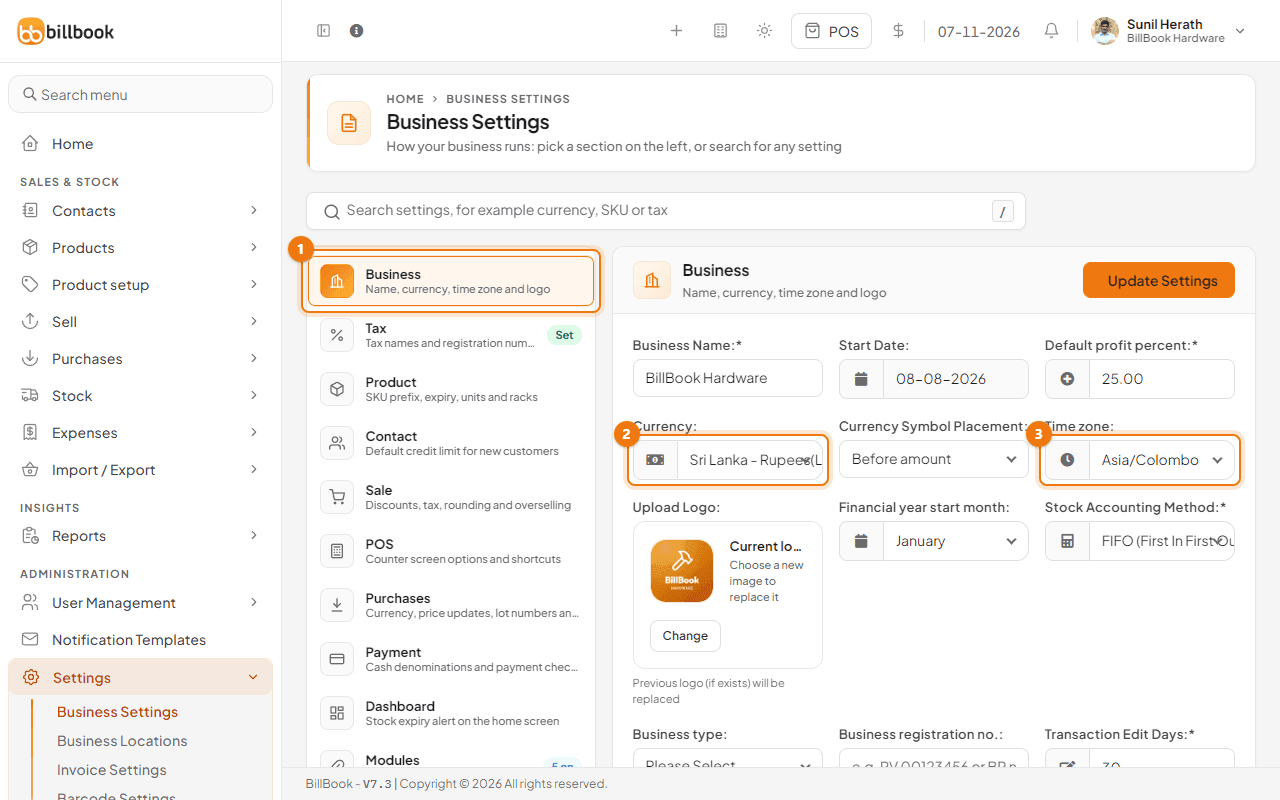
- Select the Business tab (1). It is the first tab in the list.
- Change what you need, then select Update Settings at the bottom of the page. It saves every tab at once.
These are the settings that matter most:
- Currency (2) and Currency Symbol Placement decide how amounts print, for example Rs. 1,250.00.
- Time zone (3) sets the time on every sale. For Sri Lanka choose Asia/Colombo.
- Financial year start month, Date Format, Time Format, Currency precision, Quantity precision and Paper size for PDFs and prints control how dates, numbers and printouts look.
- Business registration no. and Business type describe the business. Default profit percent is the margin BillBook suggests when you enter a product's cost.
- Transaction Edit Days is how many days after a sale or purchase it can still be edited.
- Stock Accounting Method is FIFO (first in, first out) or LIFO. Pick it before you start trading, because changing it later changes your cost of goods.
- Upload Logo puts your logo on invoices.
Tax tab#
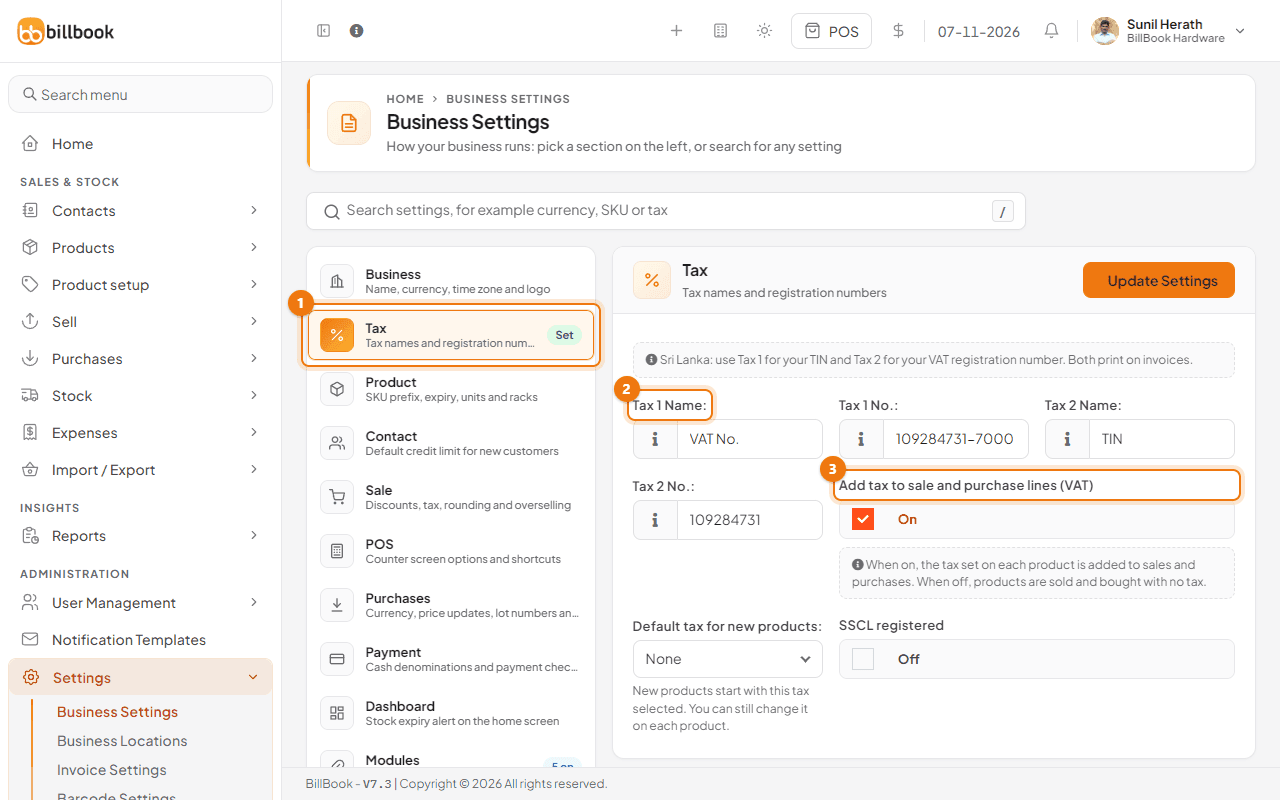
Open the Tax tab (1). Enter your Tax 1 Name (2) and Tax 1 No., and a second pair if you have one. They print on invoices. For Sri Lanka, the tab suggests using Tax 1 for your TIN and Tax 2 for your VAT registration number. Add tax to sale and purchase lines (VAT) (3) decides whether the tax set on each product is added to sales and purchases. Default tax for new products is the tax a new product starts with, and SSCL registered is for businesses that are registered for SSCL. Tax rates themselves are created under Settings > Tax Rates. See Tax rates and group taxes.
Product tab#
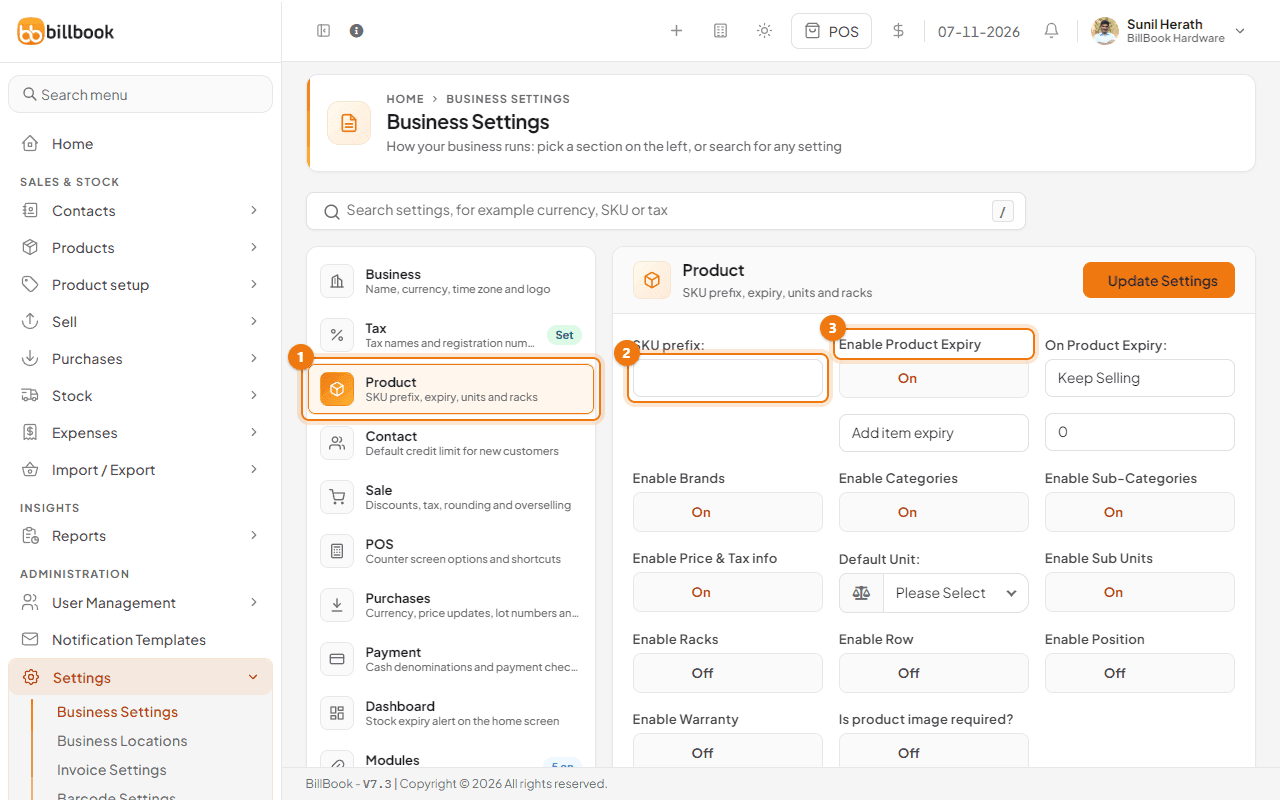
Open the Product tab (1). SKU prefix (2) is the start of every new product code, for example HW gives HW0001. Enable Product Expiry (3) adds expiry dates and lets you decide what happens to expired stock; see Track expiry and lot numbers. The other switches show or hide Brands, Categories, Sub-Categories, Price & Tax info, Sub Units, Racks, Row, Position and Warranty on product forms. Default Unit pre-selects a unit, and Is product image required? makes a picture compulsory. Turn off what you never use so forms stay short.
The Contact tab only has Default credit limit, the limit given to every new customer.
Sale and POS tabs#
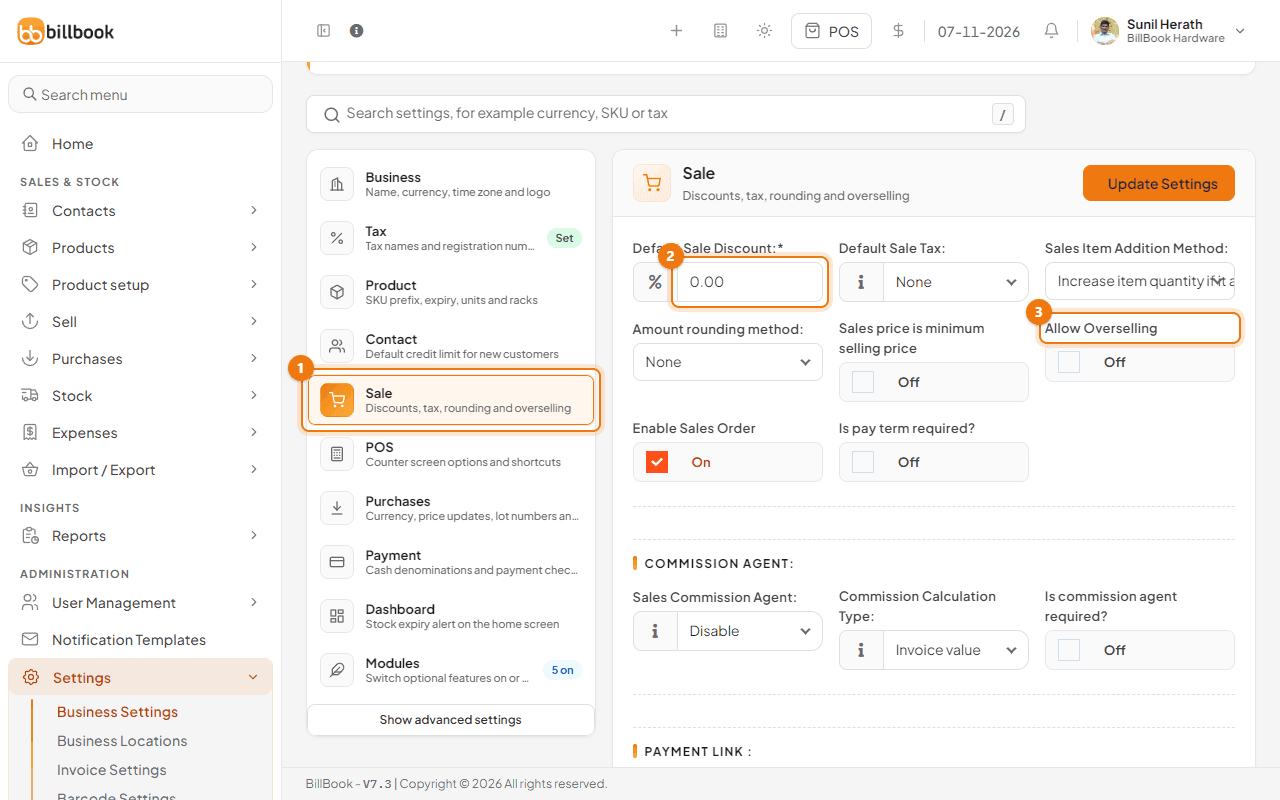
Open the Sale tab (1). Default Sale Discount (2) and Default Sale Tax are filled in on every new sale. Sales Item Addition Method decides whether adding the same item twice makes a new row or raises the quantity. Amount rounding method rounds the bill total. Allow Overselling (3) lets you sell more than you have in stock. Profit can show as negative for those items, so use it with care. Enable Sales Order adds the sales order screens. Enable payment link lets customers pay an invoice online; see Share invoices and take online payments.
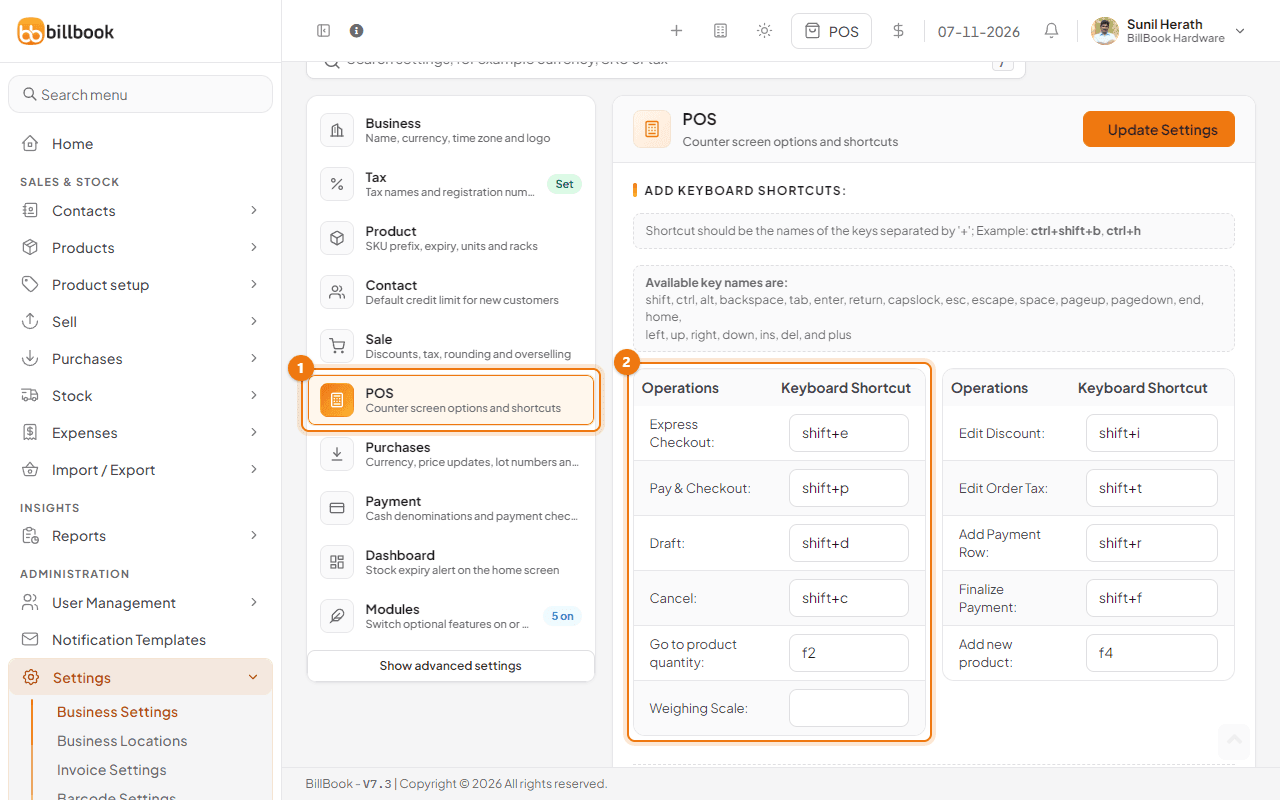
The POS tab (1) starts with keyboard shortcuts (2) for the cash counter, such as shift+p for pay and checkout. Below them are switches to hide things cashiers do not need, for example Disable Multiple Pay, Disable Draft, Disable Discount and Disable Suspend Sale. Two settings handle a register that is left open: Allow a register to stay open past the day (24-hour shop) and New day starts at (hour, 0-12). Further down you can set the Weighing Scale barcode layout.
Purchases and payment tabs#
The Purchases tab has Enable editing product price from purchase screen, Enable Purchase Status, Enable Lot number, Enable purchase order and Enable Purchase Requisition. It also sets how a purchase prints, with Purchase print style, Purchase document title and Print after saving a purchase. See Purchase orders and Purchase requisitions.
The Payment tab holds Cash Denominations for counting notes and coins, where to enable them, and a Strict check option.
Dashboard and display tabs#
The Dashboard tab has one setting, View Stock Expiry Alert For, which sets how many days ahead the home screen warns you about expiring stock.
The Display Screen tab (under Show advanced settings) turns on the customer-facing screen, sets its heading and lets you add up to ten carousel pictures. See Customer display screen.
The Email Settings, SMS Settings and WhatsApp tabs are covered in Email (SMTP) setup, SMS setup and WhatsApp and auto-send. Reward Point Settings is covered in Reward points. Modules and Custom Labels have their own pages: Turn features on or off and Custom fields.
Reference number prefixes#
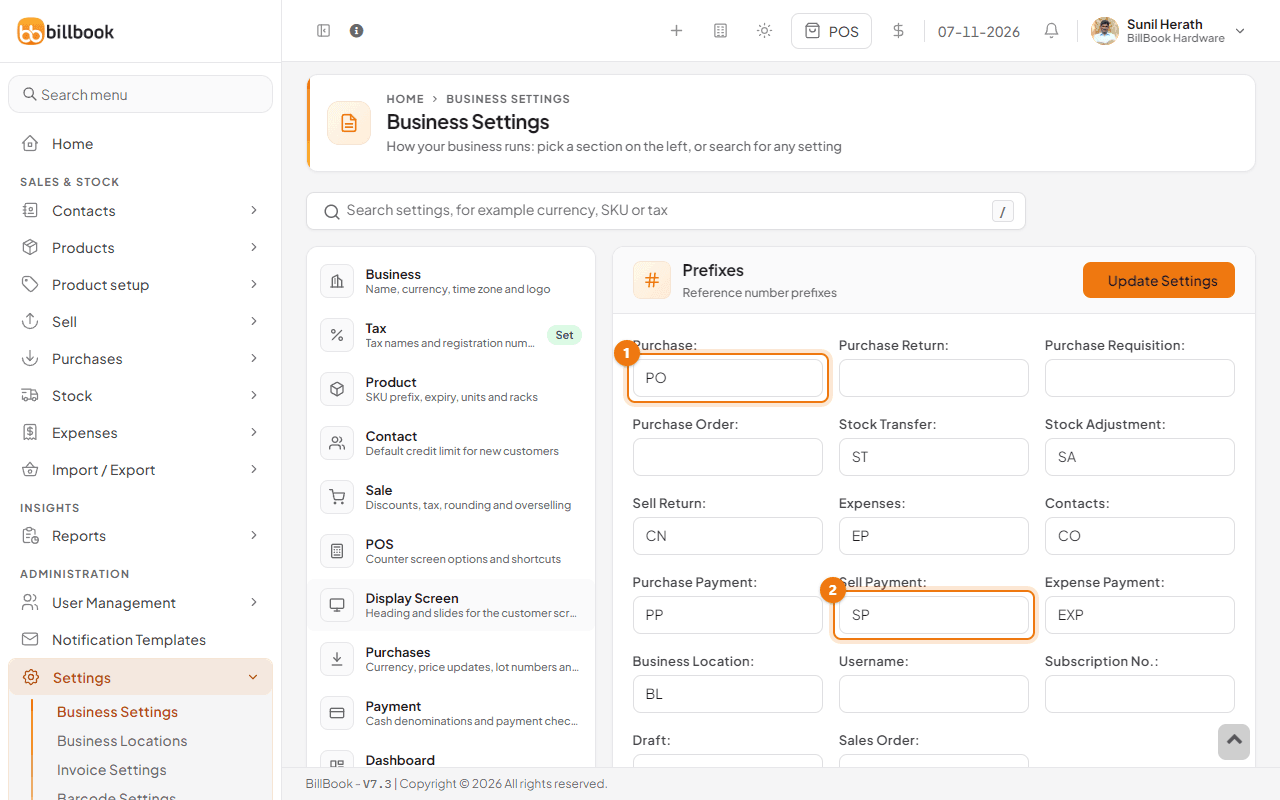
Select Show advanced settings, then open the Prefixes tab. Each box is the start of one kind of reference number: Purchase (1), Purchase Return, Purchase Requisition, Purchase Order, Stock Transfer, Stock Adjustment, Sell Return, Expenses, Contacts, Purchase Payment, Sell Payment (2), Expense Payment, Business Location, Username, Subscription No., Draft and Sales Order. Change a prefix if you want your own style, then select Update Settings. Only new numbers use it.
Sale invoice numbers do not come from this tab. They come from an invoice scheme, explained in Invoice numbering.