
Set up business locations
Last updated: 7 November 2026 · 6 min read
A business location is one place where you sell or keep stock, such as your Kandy shop, your Colombo branch or a warehouse. Each location has its own address, invoice numbering and receipt settings, and its own stock.
Before you start: You need permission to open Settings. Your plan sets how many locations can be active at once. If you reach the limit, BillBook tells you when you try to add or switch on another one.
Add a location#
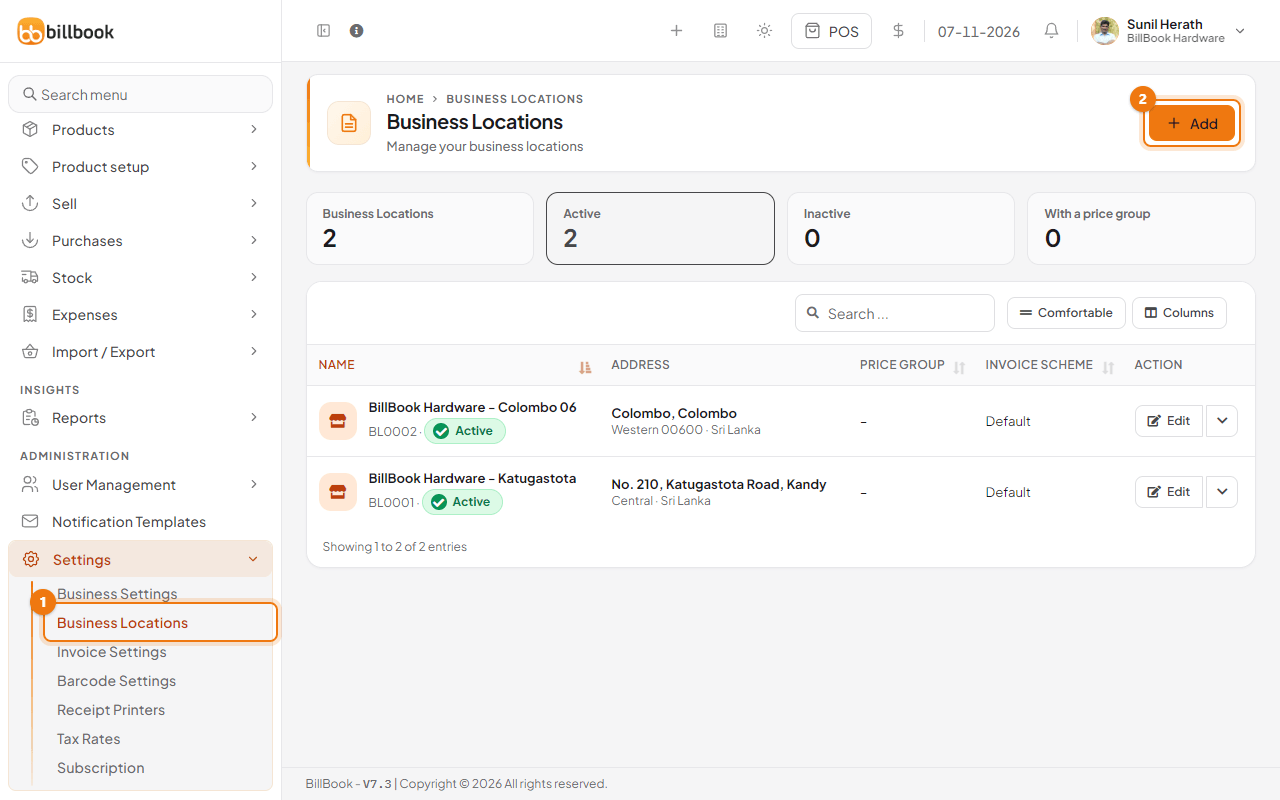
- Go to Settings > Business Locations (1). The list shows each location with its address, price group and invoice scheme, and the cards above it count your locations (all, active, inactive and with a price group).
- Select Add (2).
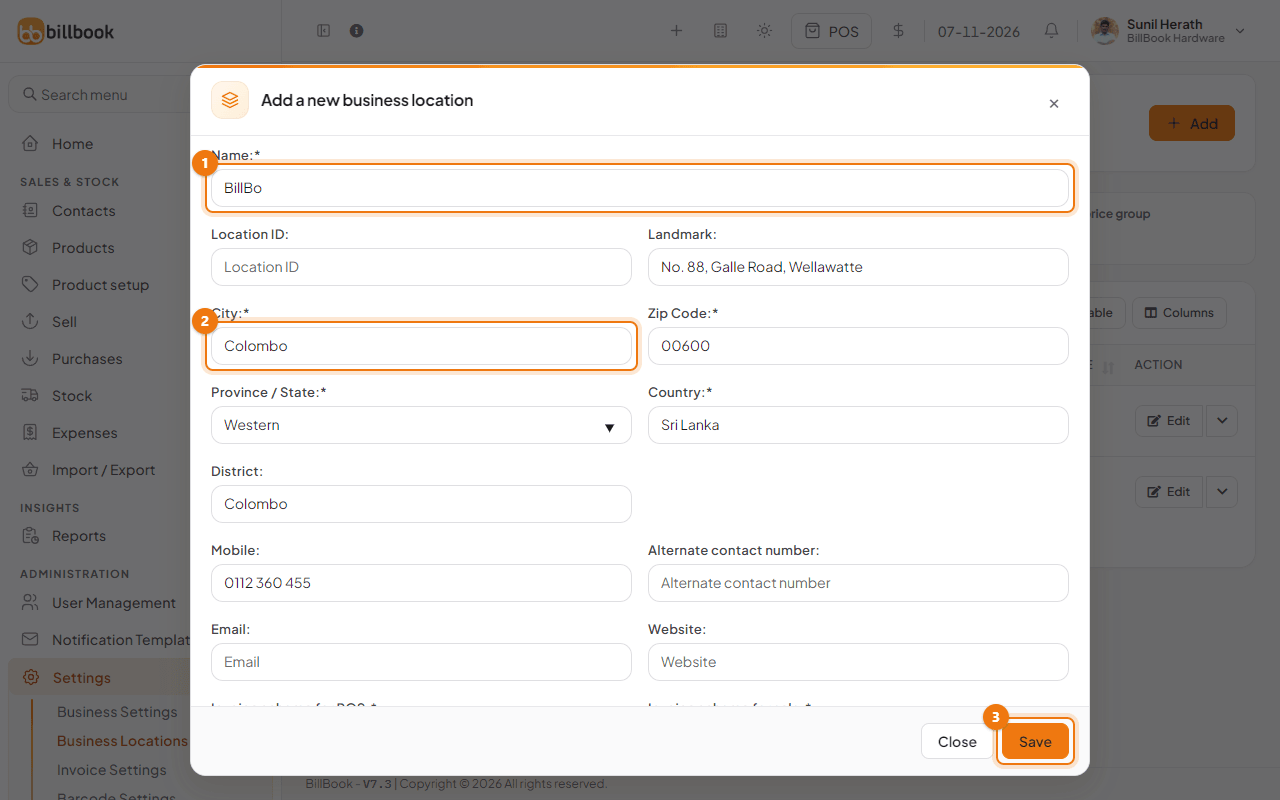
- Enter the Name (1), for example BillBook Hardware - Colombo 06. This name appears in location lists across BillBook.
- Enter the address: Landmark, City (2), Zip Code, Province / State, Country and District. Add the Mobile number, Email or Website if you want them printed for this shop.
- Leave Location ID empty to let BillBook number it for you (the first location is BL0001, the next BL0002).
- Fill in the invoice and payment settings below, then select Save (3).
BillBook shows Business location added successfully and the new location appears in the list as Active. BillBook also creates Counter 1 for it, so you can open a cash register there straight away. Your plan sets how many counters each location can have. To add more, see Cash counters.
To change a location later, select Edit on its row.
Invoice scheme and layout per location#
The invoice scheme is how invoice numbers are counted. The layout is how the printed invoice looks. You can use different ones for each location, and for POS and normal sales.
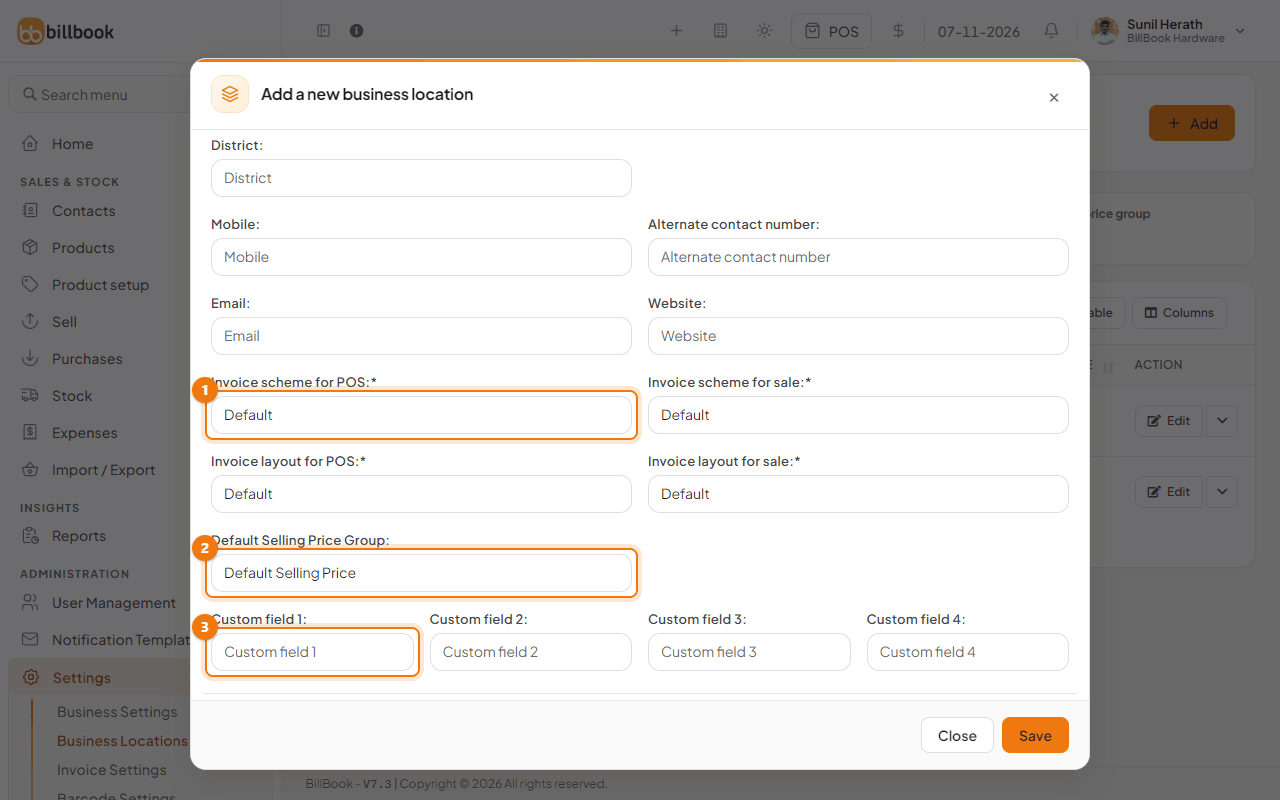
- Under Invoice scheme for POS (1) and Invoice scheme for sale, choose a scheme.
- Under Invoice layout for POS and Invoice layout for sale, choose a layout.
All four fields are required. A new business starts with one Default scheme and one Default layout. Create more under Settings > Invoice Settings.
Default selling price group#
If this location sells at different prices, such as a wholesale counter, choose a Default Selling Price Group (2). New sales at this location then start with that price group. Leave it on Default Selling Price for normal retail prices. You create price groups under Product setup > Selling Price Group.
Location custom fields#
Custom field 1 (3) to Custom field 4 are free text boxes. Use them for anything you want to keep with the location, such as a branch manager's name or a shop registration number. Below them, POS screen Featured Products lets you pick products to show first on the POS screen for this location.
Payment methods and default accounts#
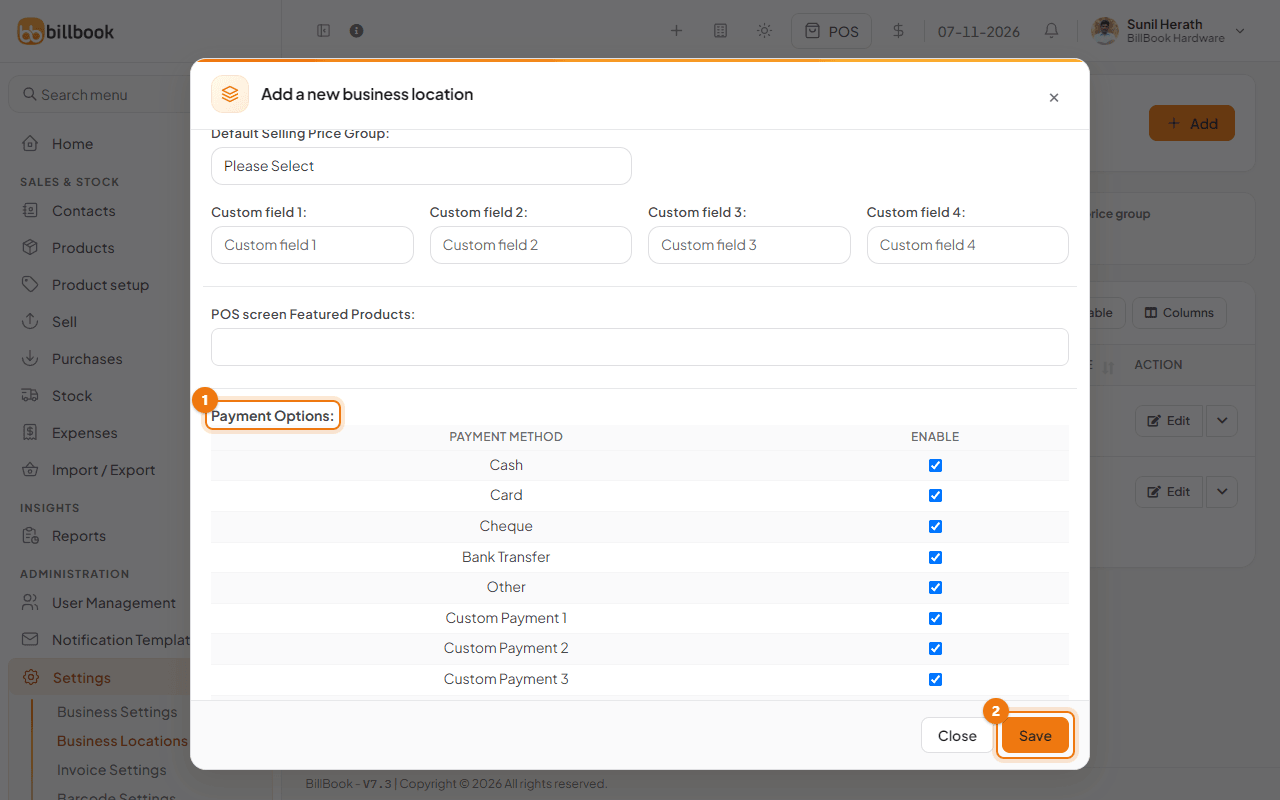
At the bottom of the form, Payment Options (1) lists Cash, Card, Cheque, Bank Transfer, Other and the custom payment methods (Custom Payment 1, Custom Payment 2 and so on).
- Tick Enable for each method this location accepts. Untick the ones you never use, so cashiers do not see them.
- If your business uses accounts, an extra column lets you choose the default account for each method. It only shows when you have accounts, so you will not see it otherwise.
- Select Save (2).
Receipt printer per location#
Receipt settings are kept on a separate page for each location.
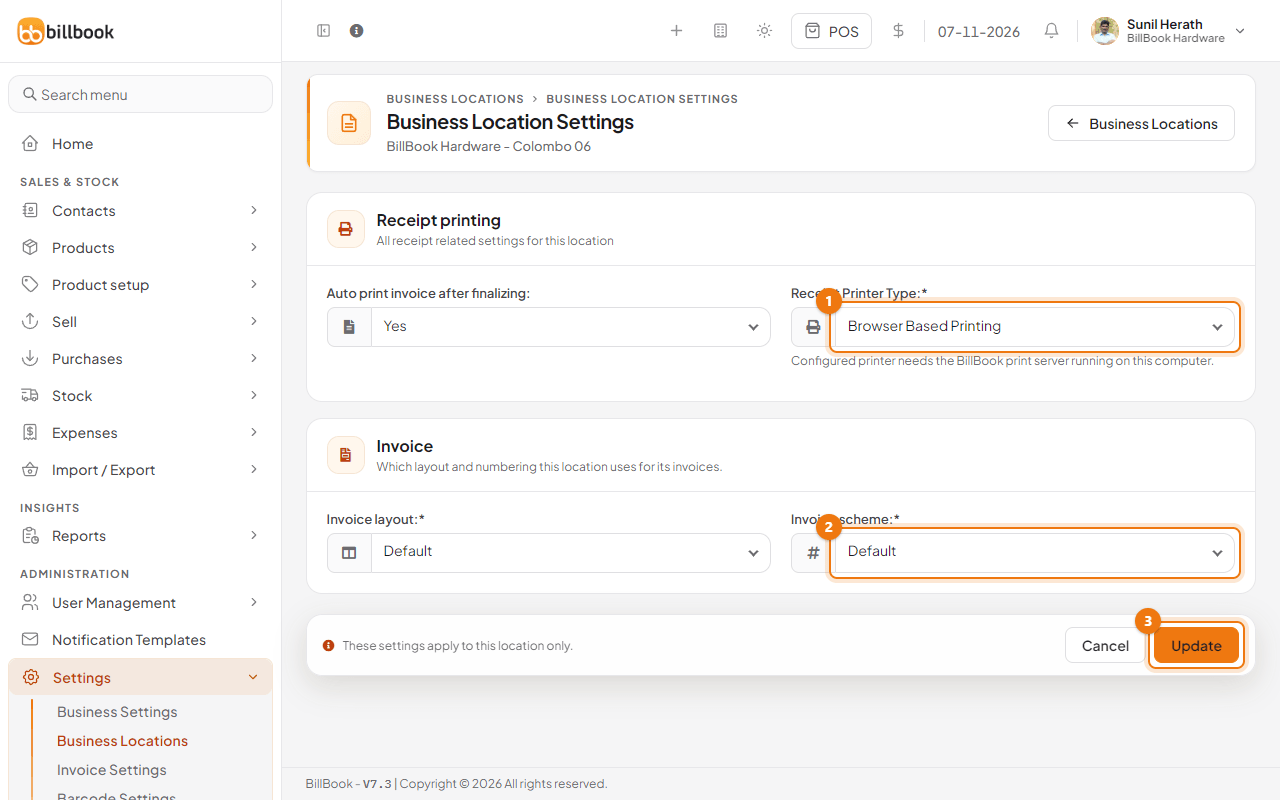
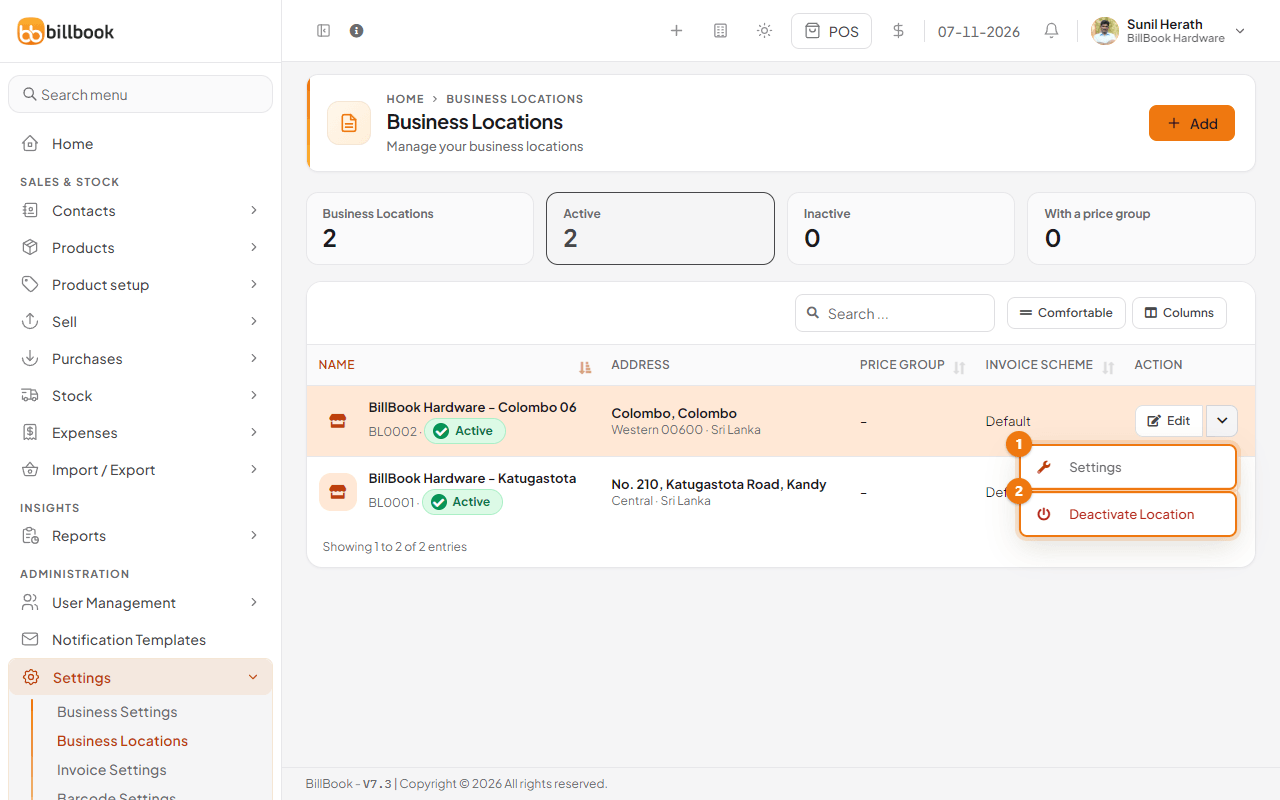
- On the Business Locations list, select the arrow next to Edit on the location's row and choose Settings (1 in the last picture on this page).
- Choose Yes or No under Auto print invoice after finalizing.
- Under Receipt Printer Type (1), choose Browser Based Printing to print through your computer's print window, or Use Configured Receipt Printer and pick a printer. You add printers under Settings > Receipt Printers. A configured printer needs the BillBook print server running on this computer; if it is not reachable, the POS tells you to start it or switch the location to browser printing.
- Check the Invoice layout and Invoice scheme (2) for this location.
- Select Update (3). A note on the page reminds you that these settings apply to this location only.
Restaurant slips per location#
If Kitchen (For restaurants) or Tables is turned on, the same Settings page has a Restaurant slips card (kitchen order tickets and tokens).
- Tick Print the KOT when the sale is finalized (1) to print the kitchen tickets when a sale is paid.
- Tick Give every order a token number (2). Tick Print the token when the sale is finalized too if you want the token slip on paper.
- Choose the Default KOT printer (3). It is used when a kitchen station has no printer of its own.
- Under Token letters, set the letter for Dine in and Takeaway (one letter from A to Z). If you use types of service, each type has its own box.
- Select Update.
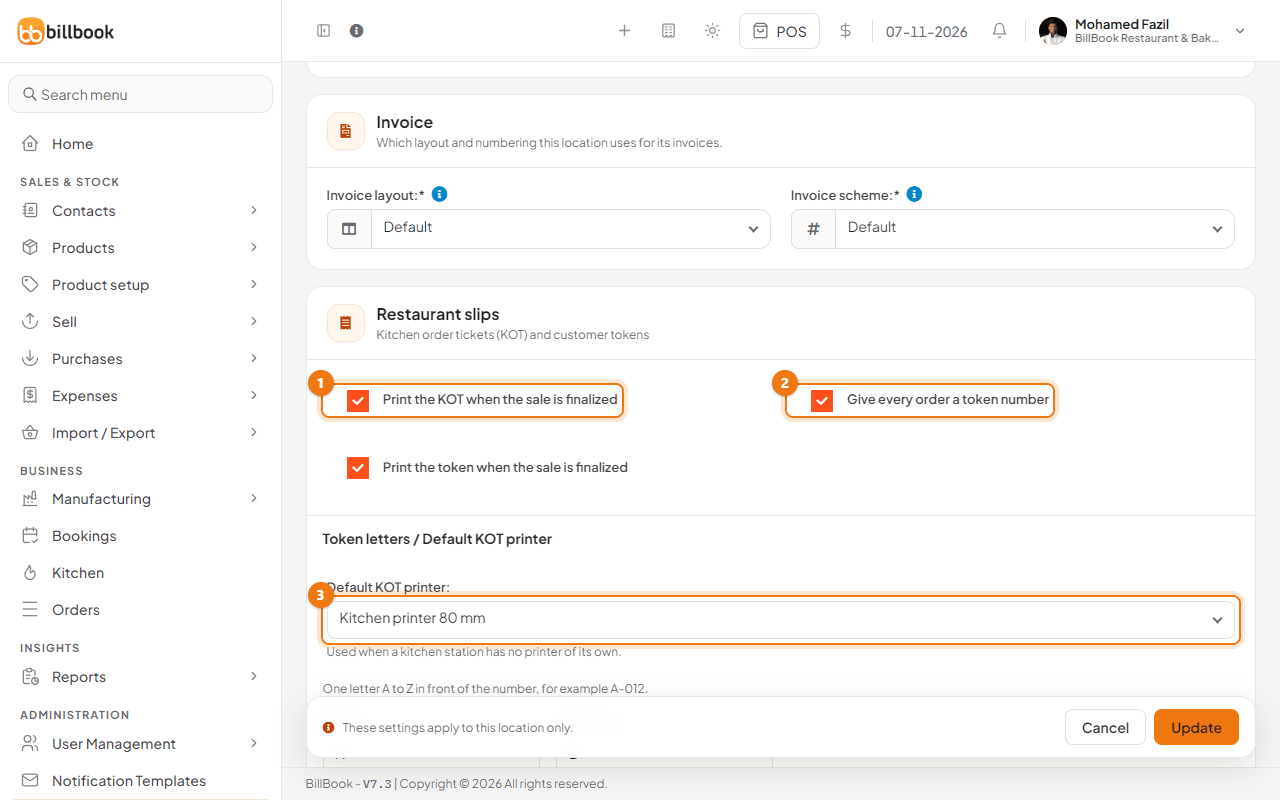
These choices apply to this location only. For the details see Print invoice, KOT and token on 80 mm and 58 mm printers and Kitchen order tickets (KOT) and token numbers.
Deactivate a location#
Deactivate a location you no longer use, for example a closed branch. It stays in the list as Inactive and you can switch it back on later.
- On the Business Locations list, select the arrow next to Edit on the location's row.
- Select Deactivate Location (2). BillBook shows Business location deactivated successfully.
- To switch it back on, open the same menu and select Activate Location.
Note: Check that no one is still selling from the location before you deactivate it. Switching a location back on counts against your plan's location limit.