
Sell from the POS screen
Last updated: 7 November 2026 · 7 min read
The POS screen is the counter screen of your shop. A cashier uses it to ring up items, take payment and finish a sale in a few taps, whether the customer is a walk-in buying a measuring tape or a contractor loading a van.
Before you start: You need at least one product with stock and permission to sell. The first time you open the POS each day, BillBook asks you to open the cash register on a counter.
Open the POS#
- Go to Sell > Sales counter, or select the POS button in the header.
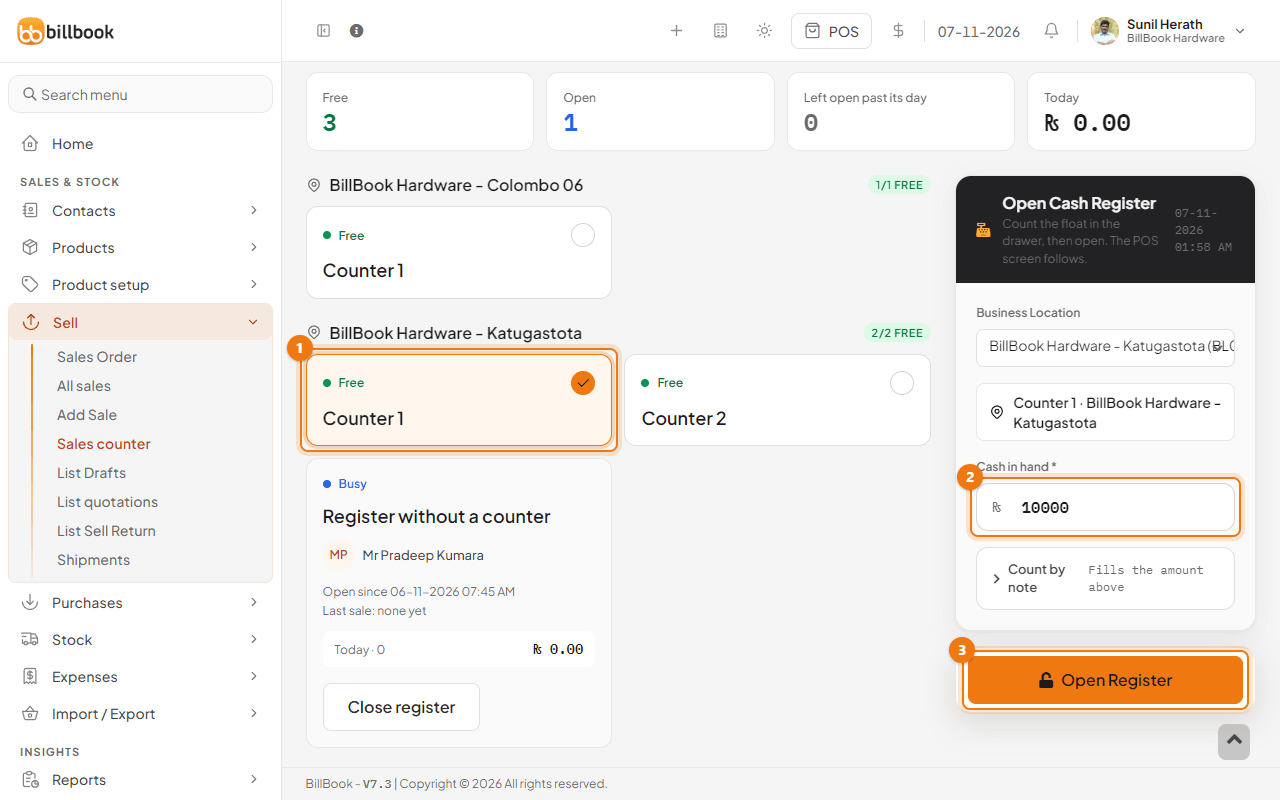
- If you have no open register, the Open Cash Register form shows beside the counters. Choose the Business Location, select a free counter (1), enter the Cash in hand (2), for example 10,000.00 for the float in the drawer, and select Open Register (3).
The POS screen opens, and the counter you opened shows in the header. For more about counters, see Cash counters. On the left are the product search box (1) and the product grid. On the right is the sale: the customer (2), the items, the totals and the payment buttons, with Pay (3) as the main one. Walk-In Customer is chosen for you, so a cash sale needs no customer. To sell to someone else, select the customer box and type a name or phone number.
For a tour of every button on this screen, see Find your way around the POS screen.
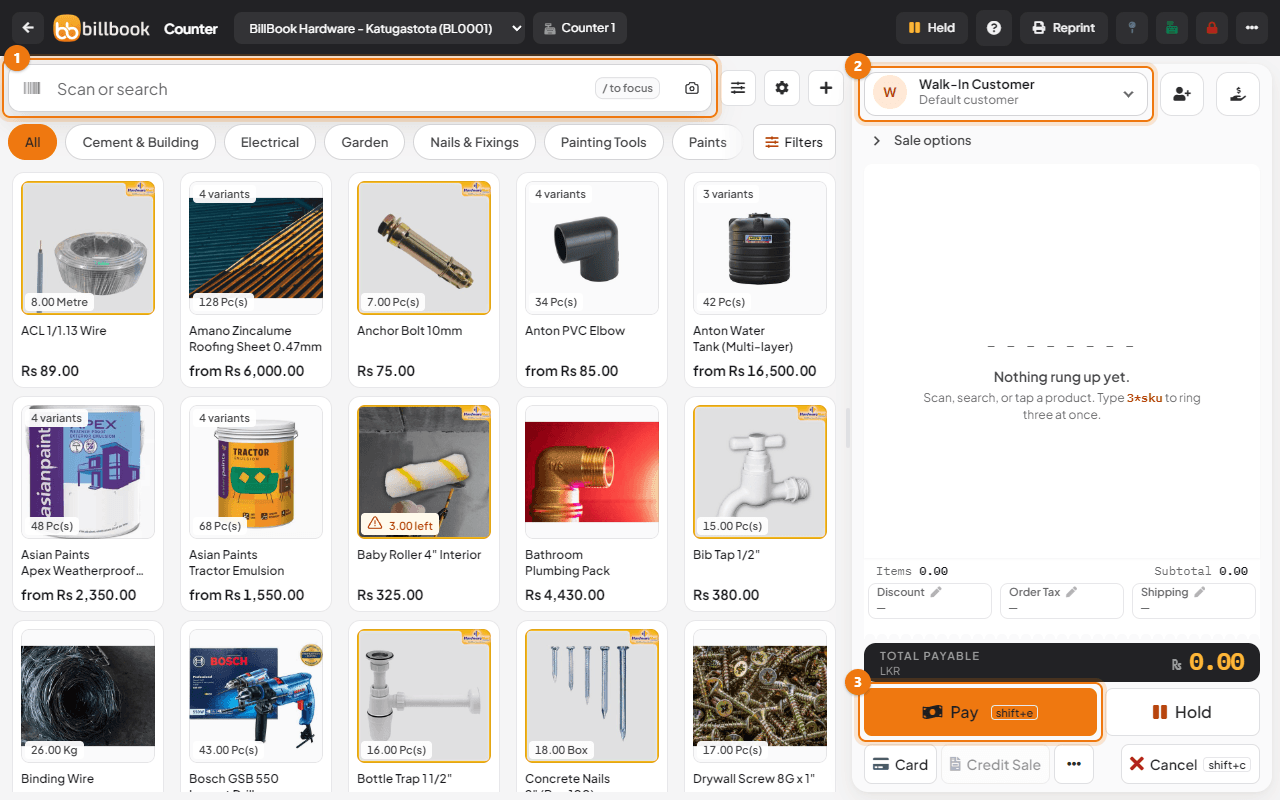
The location name at the top shows where the stock comes from. If you have more than one location, choose the right one before you add items.
Add items by scan, search or featured list#
There are three ways to put an item in the sale. Use whichever is quickest for the product in your hand.
- Scan or type the SKU. Select the search box (1), or press /, then scan the barcode or type the SKU, for example HW0092, and press Enter. The item goes straight into the sale.
- Search by name. Type part of the name, for example tape, and select the product from the list. The list shows the price and stock.
- Tap a product. Select a product card in the grid. A card shows the stock on its picture and the name and price below it. Pick a category chip such as Electrical or Paints to narrow the grid, or select Filters to choose a brand, a stock level (In stock, Low stock, Out of stock) and the sort order. A card shows Out when the item has no stock, and a warning such as 3 left when the stock is low. If you set up featured products, select Featured Products to show them beside the categories.
A product with sizes or colours, such as a paint in different tin sizes, is one card with a chip such as 4 variants and a from price. Select it and the Choose a variant window opens. Pick the colour first, then the size. The item goes into the sale as soon as you pick the last choice. Use Change in the window to go back and pick again. You can switch this grouping off in the gear panel of the POS, with Group variants into one card.
To add several of the same item at once, type the quantity, a star and the SKU, for example 3*HW0106. You can also change a quantity on the sale line with the + and - buttons or by typing in it.
If an item is added twice, BillBook adds to the same line or starts a new line, depending on Sales Item Addition Method on the Sale tab in Settings > Business Settings.
Tip: A line can be changed after you add it. Select the item name to change its price, give a discount on that line or, for some items, add a description.
Discount and order tax#
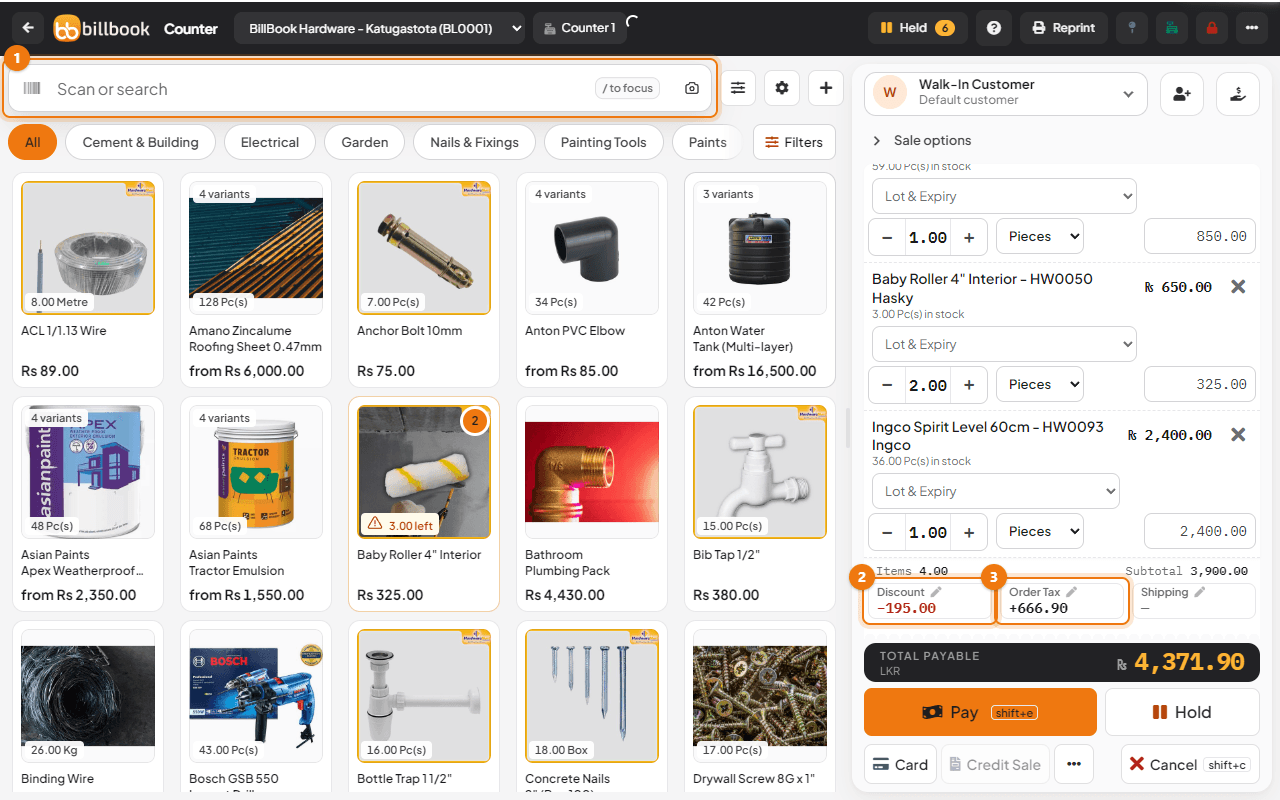
The row under the items shows Items, Total, Discount, Order Tax and Shipping.
- Select Discount (2). Choose Percentage or Fixed, enter the amount, for example 5, and select Update.
- Select Order Tax (3), choose a tax such as VAT 18% and select Update.
The Total Payable at the bottom of the screen changes straight away. In our example, 5% off Rs. 3,900.00 is Rs. 195.00, the VAT is Rs. 666.90 and the total is Rs. 4,371.90.
If you cannot see Discount or Order Tax, ask the owner to check Disable Discount and Disable order tax on the POS tab in Settings > Business Settings.
Payment methods and split payment#
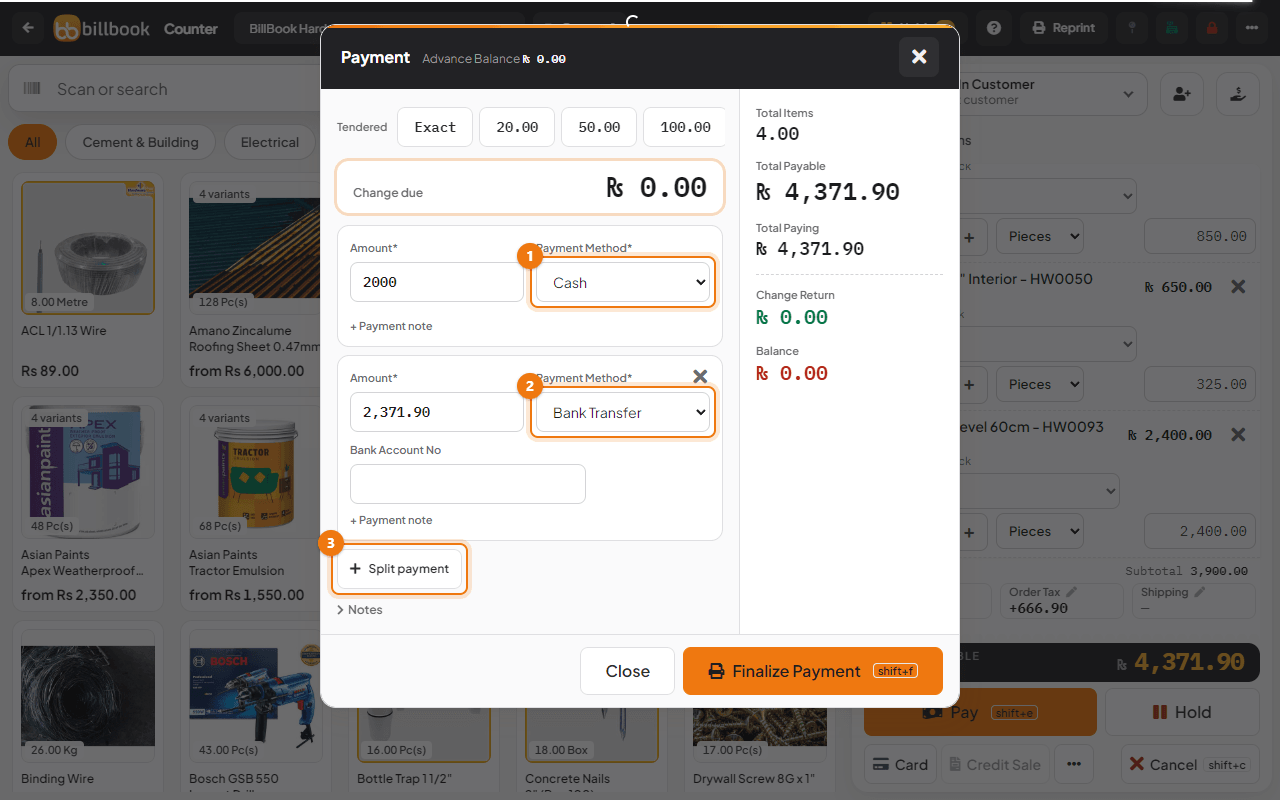
Select Pay to open the Payment window. It starts with the full amount in a Cash row, and Exact is already chosen in the Tendered row.
- Choose the Payment Method (1) for the first row: Cash, Card, Cheque, Bank Transfer, Other or one of your custom methods.
- To pay with two methods, enter how much goes on the first method in Amount, then select Split payment (3).
- In the second row choose the other Payment Method (2) and enter the rest. For example, 2,000.00 in cash and 2,371.90 by Bank Transfer. A Card row asks for the card number, holder name and transaction number, which you can leave empty.
- Check that Balance on the right shows 0.00, then select Finalize Payment.
BillBook shows Sale added successfully and clears the screen for the next customer. If a customer pays less than the total, the difference is kept as an amount they owe. See Credit sales and partial payments. If they pay more, see Give change (tender).
Pay, card, credit sale and hold#
The buttons under the total are the quick ways to finish or park a sale.
- Pay opens the Payment window with the exact amount in cash, as described above. Its shortcut is shown on the button (shift+e).
- Card finishes the sale as paid in full by card in one tap.
- Credit Sale finishes it with nothing paid. It needs a named customer, so it is switched off while Walk-In Customer is chosen. See Credit sales and partial payments.
- Hold parks the sale so you can serve the next customer. See Hold, resume and delete held sales.
- The ... button next to Card opens More: Hold with a note, Draft, Quotation, Recent Transactions, the screen split and Shortcuts.
If Card or Credit Sale is missing, Disable Express Checkout or Disable credit sale button may be switched on in the POS tab of the business settings.
After a sale, Reprint in the POS header prints the last receipt again.
Sale options under the customer box is a folded panel for the extras: the Price Group, the types of service and other fields your business uses. Select it to open it. See Types of service and packing charges.
Rounding#
BillBook can round the total of each sale, which is handy when you do not want to deal with 1 or 2 cent coins.
- Go to Settings > Business Settings and open the Sale tab.
- Choose Amount rounding method (1): None, Round to nearest whole number, or round to the nearest 0.05, 0.1 or 0.5.
- Select Update Settings.
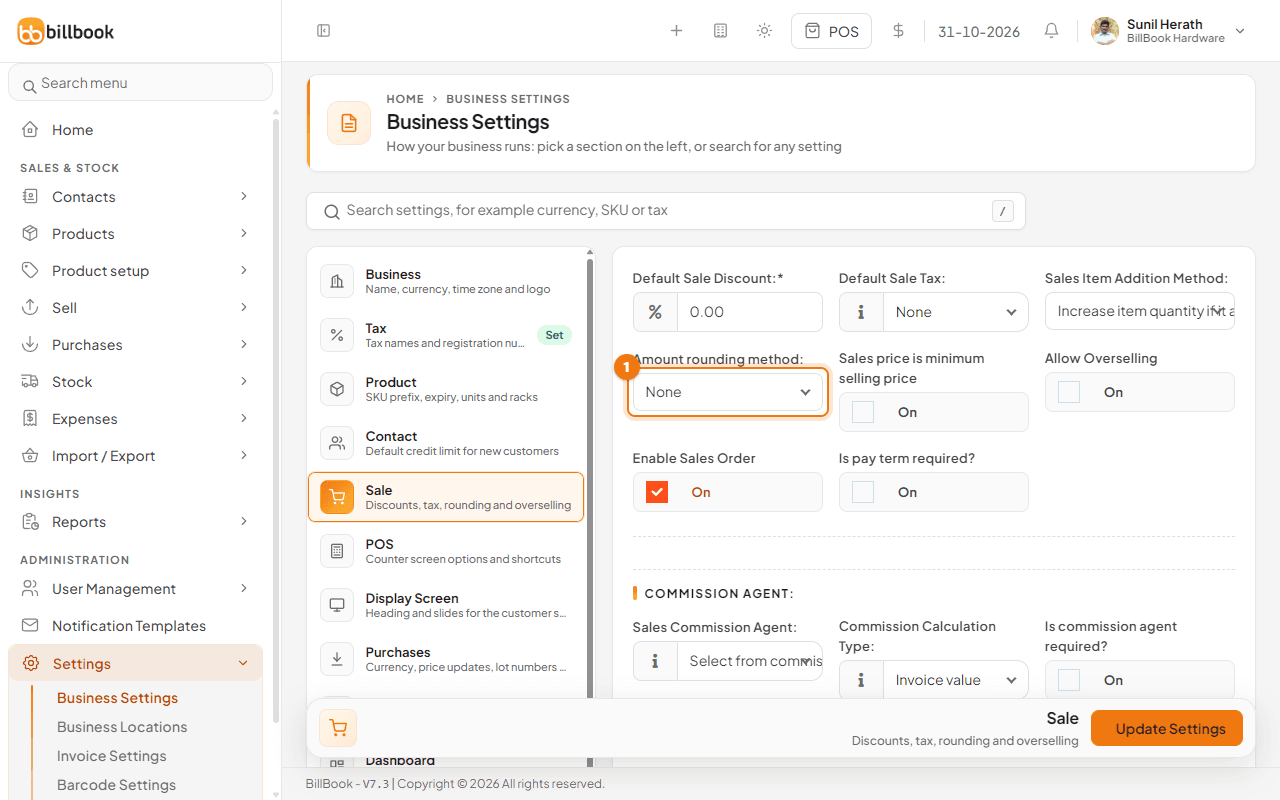
Note: The default is None, so totals are not rounded until you choose a method. Change it before you start a trading day, not in the middle of one.
Keyboard shortcuts#
If you sell with a keyboard, select the ... button (1) next to Card, then Shortcuts (2) to see the list.
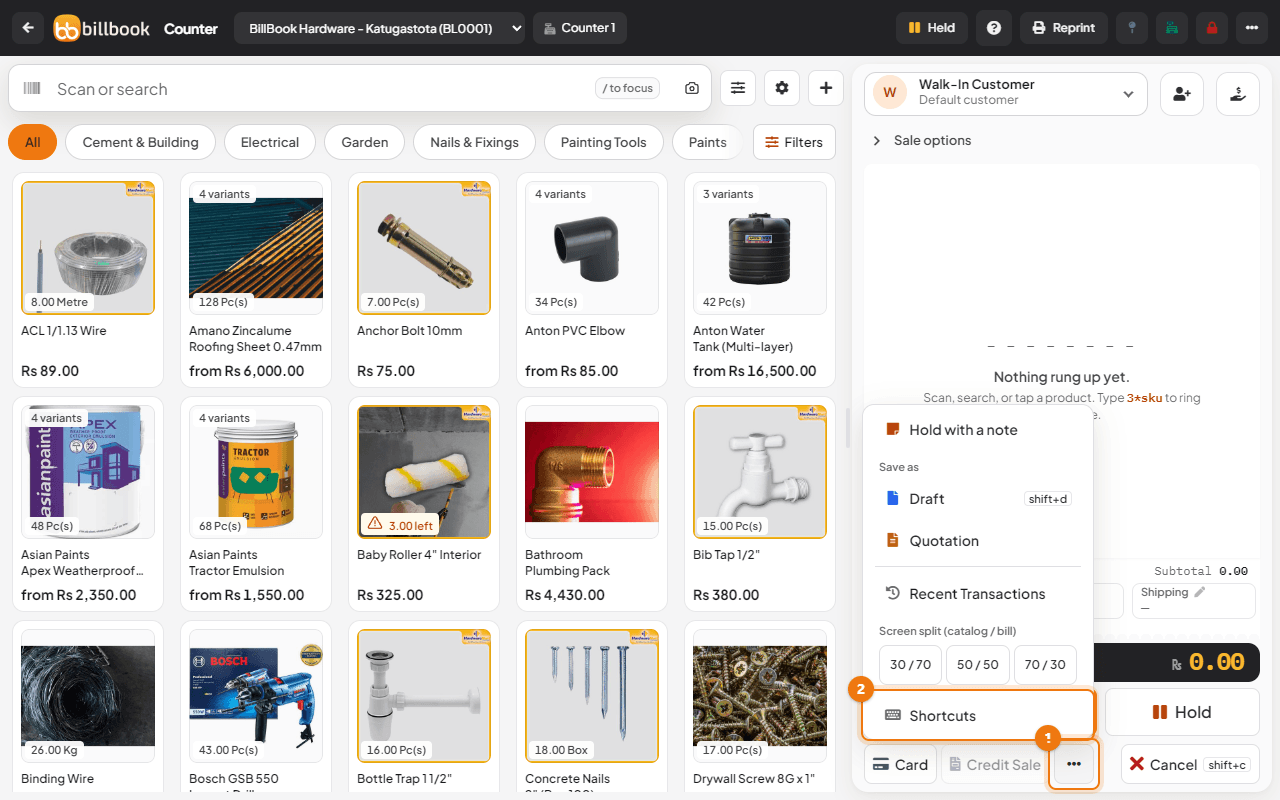
| Action | Shortcut | |---|---| | Pay | shift+e or shift+p | | Finalize payment | shift+f | | Add payment row (split payment) | shift+r | | Draft | shift+d | | Cancel | shift+c | | Discount | shift+i | | Order tax | shift+t | | Last line quantity | f2 | | Search | f4 |
The owner can change these keys on the POS tab of Settings > Business Settings, under Add keyboard shortcuts.