
Thermal receipt printer
Last updated: 4 November 2026 · 5 min read
Most shops print POS bills on a thermal roll printer. BillBook can print to it in two ways: through your browser's print window (the easy way), or straight to a printer you add under Settings > Receipt Printers.
Supported printer types#
- Thermal line printers (direct thermal): the recommended choice. Install the printer's driver, and BillBook prints through the browser print window. This works on Windows, Mac, Android phones and tablets. Use 80 mm or 58 mm paper.
- ESC/POS thermal printers: most Epson, Star and generic 80 mm receipt printers understand the ESC/POS commands. BillBook can send receipts straight to them, without the browser print window. This needs a small print server program running on the computer that sits at the counter (see the note below).
Note: A printer set to Use Configured Receipt Printer is reached through a print server on the same computer as the browser (BillBook looks for it at
ws://127.0.0.1:6441). If no print server is running, the receipt does not print and the POS shows "Receipt printer not reachable. Start the BillBook print server on this computer, or switch the location to browser printing." If you are not sure, use browser based printing.
Line printer setup#
This is browser based printing, the default for every location.
- Install the printer and its driver on your computer, and print a test page from the computer to check it works.
- Go to Settings > Business Locations. On your location's row, select the arrow next to Edit and choose Settings.
- Under Receipt Printer Type, choose Browser Based Printing.
- On the same page, set Invoice layout to a slim layout made for thermal paper. You design layouts under Settings > Invoice Settings (see Invoice layouts). Then select Update.
When you finish a sale, BillBook opens the browser print window with the receipt preview. Choose your thermal printer and print.
ESC/POS setup#
First add the printer in BillBook, then tell your location to use it.
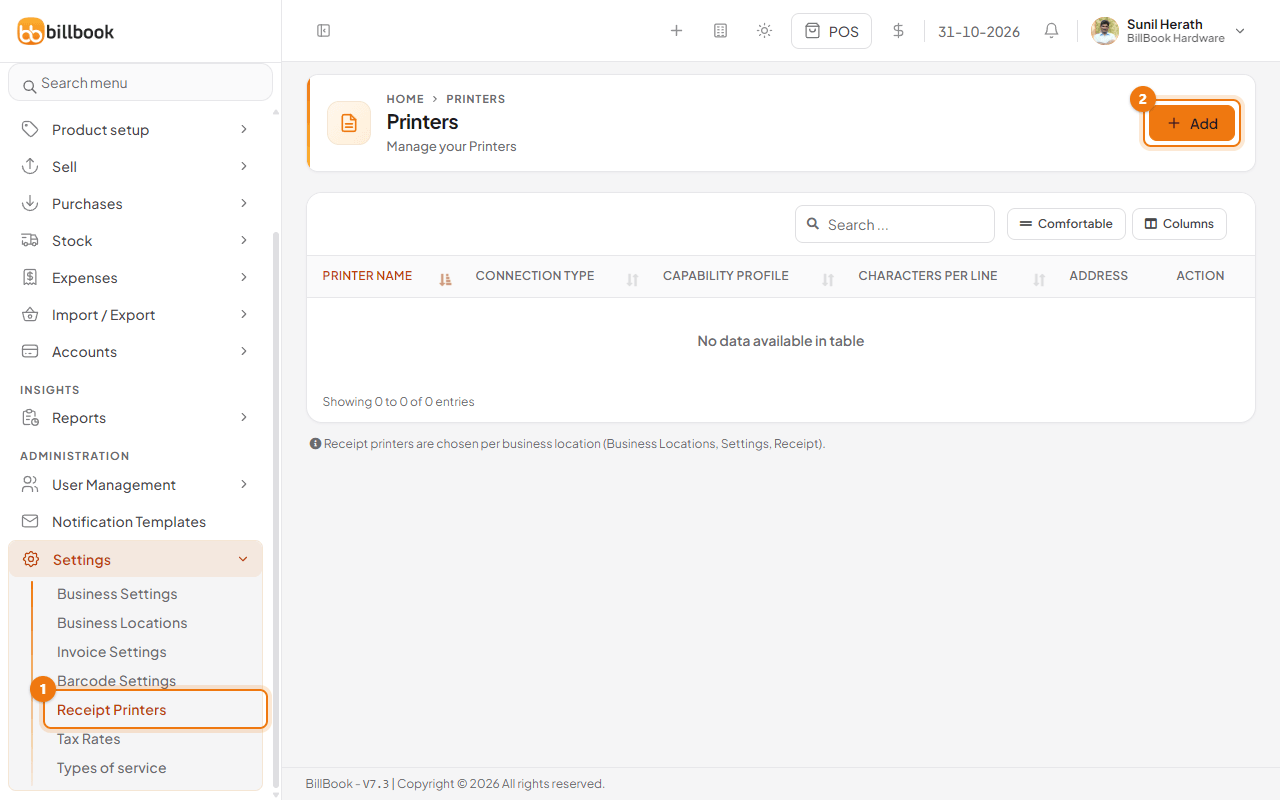
- Go to Settings > Receipt Printers (1) and select Add (2).
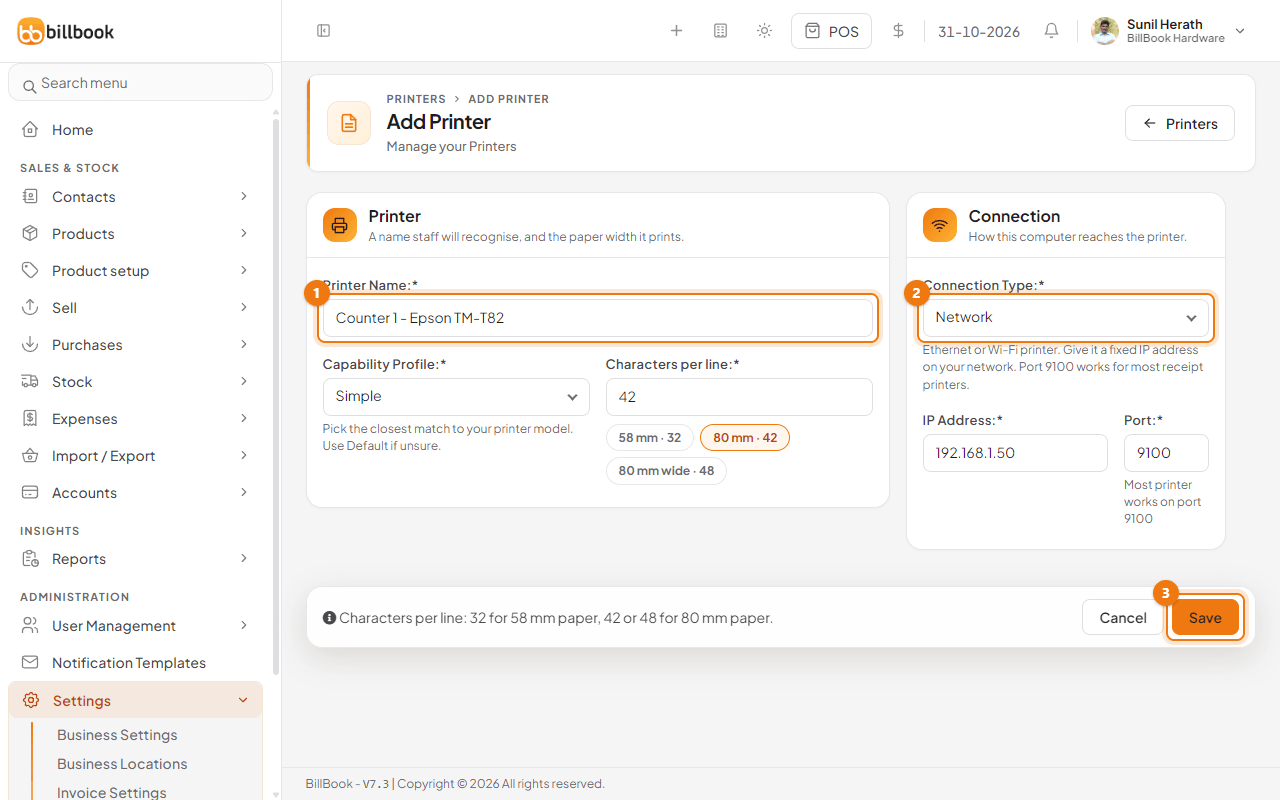
- Enter a Printer Name (1) staff will recognise, for example Counter 1 - Epson TM-T82.
- Choose the Capability Profile. Pick the closest match to your printer model, or Simple if you are not sure. Default also works for many printers.
- Set Characters per line. Use the quick buttons: 58 mm · 32, 80 mm · 42 or 80 mm wide · 48.
- Choose the Connection Type (2):
- Network: for an Ethernet or Wi-Fi printer. Enter its IP Address, for example
192.168.1.50. Give the printer a fixed IP on your router so it does not change. Port is9100, which works for most receipt printers. - windows: for a printer installed on this Windows computer. Enter the Path, for example
LPT1,COM1or the shared printer name. - Linux: for a printer on a Linux computer. Enter the Path, the printer's device file.
- Network: for an Ethernet or Wi-Fi printer. Enter its IP Address, for example
- Select Save (3).
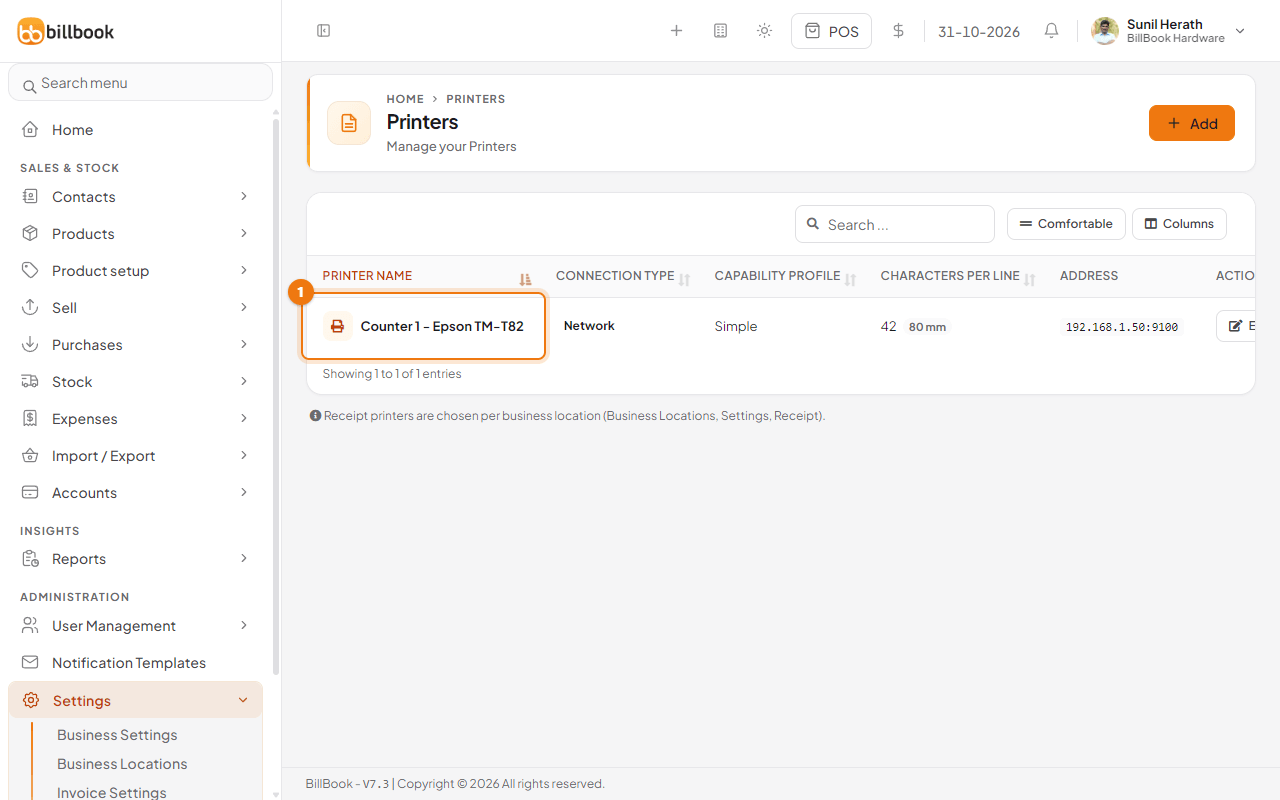
The printer appears in the Printers list with its connection type, capability profile, characters per line and address. Use Edit on its row to change it later.
Paper width, auto-cut and copies#
The printer form has a Slips card for printers that print kitchen order tickets (KOTs) and tokens. The card is folded while all three settings are on their standard values, so select Slips to open it.
- Choose the Paper width (1): 80 mm or 58 mm.
- Enter the Copies per slip (2), from 1 to 3.
- Tick Cut the paper after each slip (3) if the printer has an automatic cutter.
- Select Update.
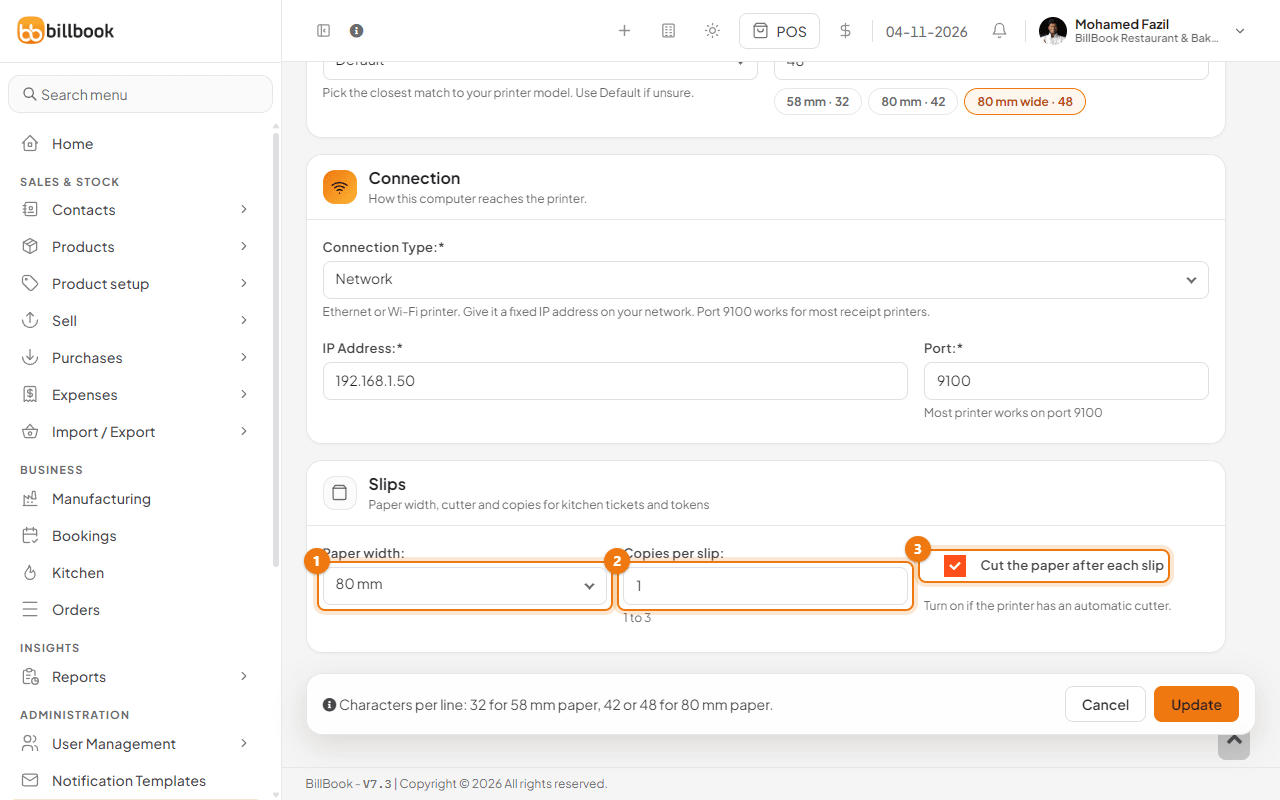
A new printer starts with 80 mm, 1 copy and no cut. These settings apply to the KOT and token slips that go through the print server. The cut command is sent after each slip, and after each copy. The invoice receipt is sent as before. See Print invoice, KOT and token on 80 mm and 58 mm printers for the full set-up, including how to cut between slips when you print through the browser.
Use the printer at a location#
Each location chooses its own printer type, so a counter with a thermal printer and an office with a normal printer can work side by side.
- Go to Settings > Business Locations, select the arrow next to Edit on the location's row and choose Settings.
- Under Receipt Printer Type (1), choose Use Configured Receipt Printer.
- In Receipt Printers (2), choose the printer you added. The page shows "Configured printer needs the BillBook print server running on this computer." Keep the BillBook print server running on that computer.
- Select Update (3). BillBook shows Receipt settings updated successfully.
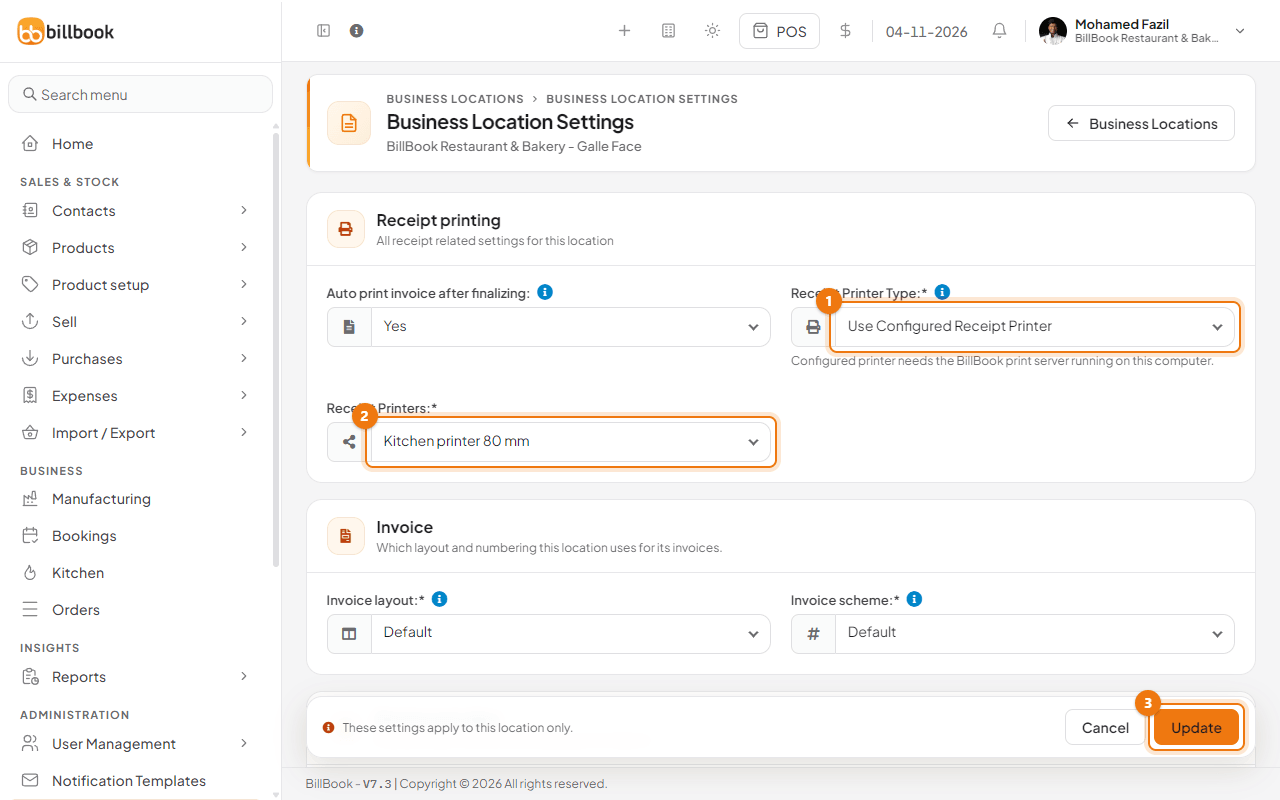
If a location uses Browser Based Printing, the Receipt Printers field is not needed.
Bluetooth printing on mobile#
You do not need to add anything in BillBook. Pair the Bluetooth thermal printer with the phone or tablet in its Bluetooth settings, keep Browser Based Printing on, and print the receipt from the print window like any other document.